[ITEM]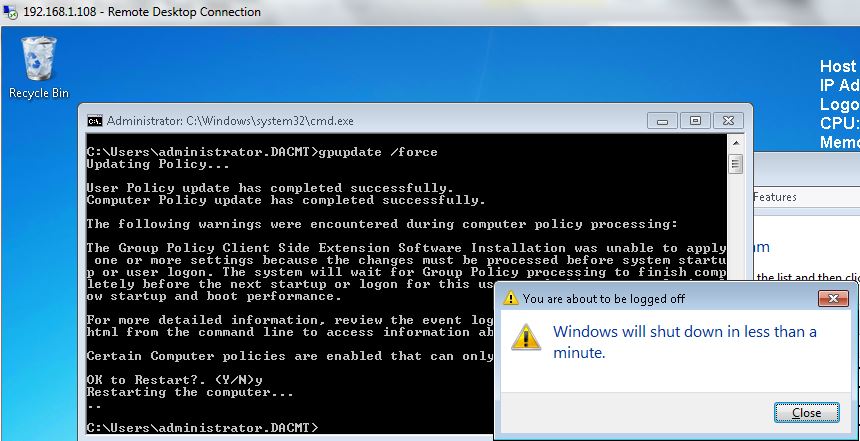
 [/ITEM]
21.03.2020
37
This GPO installation process requires the creation of the MST file that goes along with your MSI. The MST file modifies the MSI installer and ensures that the DomainAuthToken value is applied during installation. The token is an important piece of the installation as it is used by the Xink client to authenticate users before it updates their signature.
How to create the MST file
1.Download and Install Orca (Typical Installation Type). This is a Microsoft-published application used to modify MSI. CLICK HERE TO DOWNLOAD
If group policy is not installing software, you may see this message when running a: gpupdate /force The Group Policy Client Side Extension Software Installation was unable to apply one or more settings because the changes must be processed before system startup or user logon.
2.Download the Xink MSI from the Xink portal’s Preferences > Downloads section.
3.Launch Orca. Click File > Open, locate your Xink MSI then click Open.
5. Click Registry from Tables section.
6. Double-click [DOMAINAUTHTOKEN] and paste the token value from the Xink portal.
Where do I find my token?
Go to Xink portal>Preferences>Downloads >Step 2
7. Double-Click TokenExtra and replace with Core
8. Click Transform > Generate Transform and save the MST file to a network share. Video easy 5 hd crack full.
How to deploy the Xink MSI and MST files via GPO
1. Create a Group Policy Object. Open Group Policy Management. Right-click the User OU where you want to target your Xink Client MSI installation. Select 'Create a GPO in this domain, and Link it here..' and name your GPO 'E.g. Deploy Xink MSI Package'
 .To install an extension, follow the instructions that came with the extension app.Open Final Cut Pro.Click the Extensions button on the left side of the Final Cut Pro toolbar.The Extensions button appears only when extensions are installed.The extension window or a menu of installed extensions opens.Use the extension interface to locate the media you want to import.Drag items from the extension window to an in the or to a project in the.To close the extension window, click the Extensions button.To uninstall an extension, remove it from the Applications folder and reopen Final Cut Pro.
2. Right-click and Edit the newly created GPO 'E.g. Deploy Xink MSI Package'. Expand Computer Configuration > Software Settings.
3. From the Right-Click menu, select Software Installation > New > Package..
4. Point to the Xink MSI. Note: It is very important that the location of both the xinkClientSetupAD MSI and MST files is not a local folder or drive. Rather, the path should be through a network share accessible from everywhere in your network and to which everyone has at least Read permissions.
5. Under Deployment Method, choose Advanced. If you choose another option, you won't be able to apply the MST file you created.
6. Add a name for the package for easy identification (e.g. Xink AD Client).
7. Switch to the Modifications tab and click Add. Point to the corresponding MST file and click OK.
8. Finally, log in to one of the target PC and run 'gpupdate /force' on command prompt.
Using other software deployment tools? (SCCM, PDQ, etc.)
Save both MSI and MST files in the same network share and use the below script to create your package.
Note: 'Share Path' should be replaced with the UNC path where these files are placed. Use elevated privileges if required.
- Author: admin
- Category: Category
Search
Latest Articles
- Huawei Ec6108v9 Firmware Update
- Videoimpression 2 Gratis Italiano
- Battlefield 2 Download Completo Pc
- How To Download Gta 5 Police Mod
- Study Guide And Intervention Tangents
- Illegal Tender Soundtrack Mp3 Download
- Laila Shootout At Wadala Hd Free Download
- Big Hero 6 Full Movie In Tamil Download
- Fallout New Vegas Stealth Build
This GPO installation process requires the creation of the MST file that goes along with your MSI. The MST file modifies the MSI installer and ensures that the DomainAuthToken value is applied during installation. The token is an important piece of the installation as it is used by the Xink client to authenticate users before it updates their signature.
How to create the MST file
1.Download and Install Orca (Typical Installation Type). This is a Microsoft-published application used to modify MSI. CLICK HERE TO DOWNLOAD
If group policy is not installing software, you may see this message when running a: gpupdate /force The Group Policy Client Side Extension Software Installation was unable to apply one or more settings because the changes must be processed before system startup or user logon.
2.Download the Xink MSI from the Xink portal’s Preferences > Downloads section.
3.Launch Orca. Click File > Open, locate your Xink MSI then click Open.
5. Click Registry from Tables section.
6. Double-click [DOMAINAUTHTOKEN] and paste the token value from the Xink portal.
Where do I find my token?
Go to Xink portal>Preferences>Downloads >Step 2
7. Double-Click TokenExtra and replace with Core
8. Click Transform > Generate Transform and save the MST file to a network share. Video easy 5 hd crack full.
How to deploy the Xink MSI and MST files via GPO
1. Create a Group Policy Object. Open Group Policy Management. Right-click the User OU where you want to target your Xink Client MSI installation. Select 'Create a GPO in this domain, and Link it here..' and name your GPO 'E.g. Deploy Xink MSI Package'
.To install an extension, follow the instructions that came with the extension app.Open Final Cut Pro.Click the Extensions button on the left side of the Final Cut Pro toolbar.The Extensions button appears only when extensions are installed.The extension window or a menu of installed extensions opens.Use the extension interface to locate the media you want to import.Drag items from the extension window to an in the or to a project in the.To close the extension window, click the Extensions button.To uninstall an extension, remove it from the Applications folder and reopen Final Cut Pro.
2. Right-click and Edit the newly created GPO 'E.g. Deploy Xink MSI Package'. Expand Computer Configuration > Software Settings.
3. From the Right-Click menu, select Software Installation > New > Package..
4. Point to the Xink MSI. Note: It is very important that the location of both the xinkClientSetupAD MSI and MST files is not a local folder or drive. Rather, the path should be through a network share accessible from everywhere in your network and to which everyone has at least Read permissions.
5. Under Deployment Method, choose Advanced. If you choose another option, you won't be able to apply the MST file you created.
6. Add a name for the package for easy identification (e.g. Xink AD Client).
7. Switch to the Modifications tab and click Add. Point to the corresponding MST file and click OK.
8. Finally, log in to one of the target PC and run 'gpupdate /force' on command prompt.
Using other software deployment tools? (SCCM, PDQ, etc.)
Save both MSI and MST files in the same network share and use the below script to create your package.
Note: 'Share Path' should be replaced with the UNC path where these files are placed. Use elevated privileges if required.
Search
Latest Articles
- Huawei Ec6108v9 Firmware Update
- Videoimpression 2 Gratis Italiano
- Battlefield 2 Download Completo Pc
- How To Download Gta 5 Police Mod
- Study Guide And Intervention Tangents
- Illegal Tender Soundtrack Mp3 Download
- Laila Shootout At Wadala Hd Free Download
- Big Hero 6 Full Movie In Tamil Download
- Fallout New Vegas Stealth Build
Gpupdate Force Software Install В© 2020